

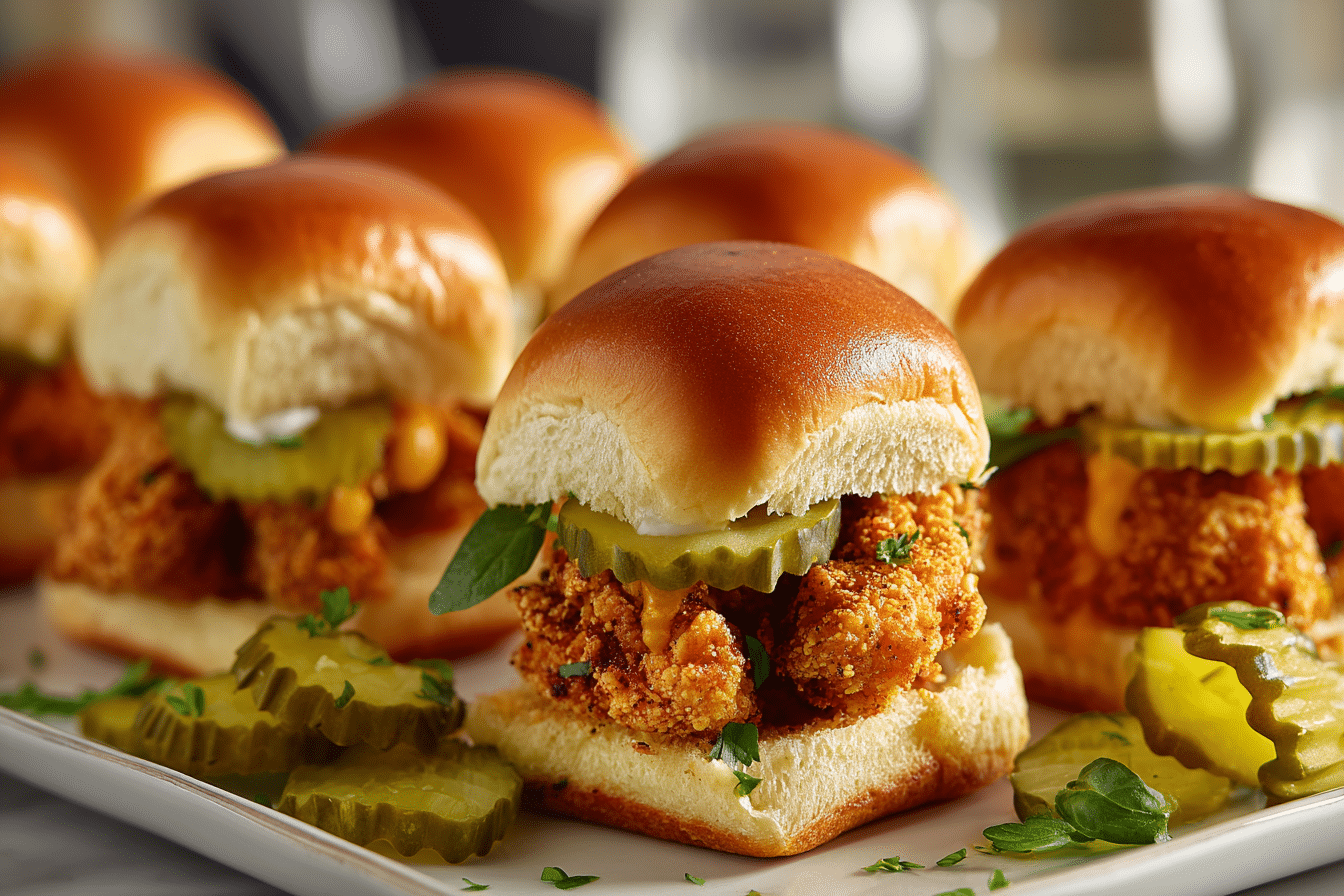
Crispy chicken sliders already have a special place in comfort food favorites—but when that chicken is marinated in pickle juice? The flavor is next-level. These Pickle-Brined Crispy Chicken Slider Bites are the kind of dish that turns heads and disappears quickly. Juicy, well-seasoned chicken coated in a golden, crunchy crust and tucked into warm slider buns—they’re the ultimate crowd-pleaser.
Pickle brine does more than just hint at tang; it infuses the chicken with deep, mouthwatering flavor and helps lock in moisture. Once fried, each piece is ultra-crispy on the outside and tender on the inside. Whether you’re hosting a weekend gathering or just spicing up a weeknight meal, these sliders offer an exciting, satisfying option with every bite.
They’re fun, snackable, and seriously flavorful. With a bit of preparation, you’ll have a batch ready to serve in no time—and your kitchen might just become everyone’s favorite hangout spot.
Ingredient Breakdown
Chicken (Thighs or Breasts)
Go for boneless, skinless chicken thighs if you want juicy, flavorful bites. Chicken breasts are a suitable alternative if you’re looking for a leaner protein, though they’re a bit less forgiving when cooked.
Pickle Juice
Don’t toss that leftover brine from your pickle jar—it’s the real star here. Its acidity tenderizes the chicken while adding a signature tang that defines the flavor of these bites. You can opt for dill brine or sweet brine, depending on your taste preference.
Buttermilk
Combines with the brine to both mellow the acidity and act as a tenderizer. It also plays a crucial role in helping the flour-based coating stick. If you don’t have buttermilk, mix a tablespoon of vinegar or lemon juice with a cup of milk as a substitute.
Flour and Cornstarch
This duo creates a perfect crust. The flour provides structure, while the cornstarch gives the fried chicken that extra crunch. It’s a simple combo that delivers crispy magic.
Seasonings
A blend of paprika, garlic powder, onion powder, black pepper, salt, and a pinch of cayenne adds warmth and complexity. It balances the tangy brine and builds flavor into every bite.
Eggs
They act as the binding agent, helping the dry coating stick to the brined chicken effectively.
Frying Oil
Use a neutral oil like canola, peanut, or vegetable oil. These have high smoke points and don’t interfere with the flavor of the chicken.
Slider Buns
Soft, slightly sweet buns like Hawaiian or potato rolls work best. Their fluffiness provides contrast to the crisp chicken and makes each slider feel complete.
Optional Add-Ons
Classic dill pickle slices and a swipe of your favorite sauce—think spicy mayo, ranch, or honey mustard—bring it all together with just the right touch.
Instructions, Step-by-Step
1. Start the Brine
Chop the chicken into smaller pieces suited for sliders. In a bowl, stir together the pickle juice and buttermilk. Add the chicken, making sure it’s fully submerged. Cover and refrigerate for at least four hours. For maximum flavor and juiciness, leave it overnight.
2. Set Up Your Coating Station
Once marinated, prepare two shallow bowls—one with beaten eggs, and another with the seasoned dry mix: flour, cornstarch, and spices. Have a plate ready to place the coated chicken before frying.
3. Dredge the Chicken
Remove the chicken from the brine and gently pat each piece with paper towels to remove excess moisture. Dip into the egg mixture, then roll in the flour mixture until evenly coated. Press lightly to ensure a thick, crispy coating. Let the coated pieces rest for 10–15 minutes before frying to help the crust set.
4. Heat Your Oil
In a deep skillet or Dutch oven, heat 2 inches of oil to 350°F. Maintain this temperature while frying—too low, and the chicken will soak up oil; too high, and the outside will burn before the inside cooks through.
5. Fry in Batches
Work in small batches, frying each piece for about 3 to 4 minutes per side, or until the coating is deep golden brown and the chicken is cooked through. Use a meat thermometer to check for an internal temperature of 165°F.
6. Rest on a Rack
Transfer the fried chicken to a wire rack set over a baking sheet. This keeps it crispy by allowing air to circulate around each piece. Avoid using paper towels, which can cause steam and soften the crust.
7. Toast the Buns
Butter and lightly toast the slider buns in a hot skillet or under the broiler until golden. It’s a small touch that keeps the buns from getting soggy and adds flavor.
8. Assemble and Serve
Layer one piece of fried chicken on each bottom bun. Add pickles and a drizzle of your preferred sauce. Top with the other half of the bun and serve immediately.
Smart Tips, Variations & Alternatives
Tips for Success
-
Don’t skip the brine—it’s key to flavor and tenderness.
-
Resting the coated chicken before frying makes the crust sturdier.
-
Keep fried chicken in a warm oven while finishing batches to stay crisp.
Flavor Swaps
-
Want extra heat? Mix hot sauce into the brine or egg wash.
-
Add some shredded lettuce, coleslaw, or sliced jalapeños for crunch and freshness.
-
Try panko breadcrumbs instead of flour for a different kind of crispiness.
Substitutions
-
No buttermilk? Use milk with vinegar or lemon juice.
-
Gluten-free flour and cornstarch work well for those avoiding wheat.
-
Prefer baking? Lightly coat the chicken in oil and bake on a wire rack at 425°F until crispy and cooked through.
When to Serve & What to Pair
These sliders are made for sharing. They shine at casual events, family dinners, tailgates, or anytime you want something flavorful and easy to eat.
Perfect Pairings:
-
Serve with crunchy potato chips, sweet potato fries, or a crisp green salad.
-
Pair with drinks like iced tea, craft beer, or sparkling water with citrus.
-
Add dipping sauces like barbecue, spicy ranch, or even tzatziki for a Mediterranean flair.
They also make great finger food for parties—just serve with toothpicks or keep them on a tray for grab-and-go convenience.
Nutrition & Dietary Notes
While fried chicken may not be an everyday meal, these sliders can be made more balanced with a few simple tweaks. The pickle brine adds flavor without fat, and using smaller portion sizes helps control indulgence.
Healthier Ideas:
-
Use chicken breast instead of thighs for a leaner protein.
-
Air fry or bake the chicken to reduce oil content.
-
Serve with fresh veggies or fruit instead of heavy sides.
Pickles themselves are low in calories and offer a nice salty bite without needing extra condiments. Just be mindful of sodium if you’re watching salt intake.
Frequently Asked Questions
1. Can I substitute chicken nuggets or tenders?
Yes. Chicken tenders are a great shortcut and already the right size. Just brine and coat them the same way, adjusting cook time as needed.
2. What can I use if I run out of pickle juice?
A quick mix of white vinegar, water, garlic, and salt can stand in for pickle brine. It won’t be quite the same, but it adds tang and tenderness.
3. Can I prep everything ahead of time?
You can marinate and even bread the chicken in advance. Store it in the fridge on a baking sheet until you’re ready to fry. Frying just before serving gives the best texture.
4. How can I tone down the saltiness?
Use a reduced-sodium pickle brine or dilute it with water. Also, reduce or skip extra salt in the flour mix if your brine is especially salty.
5. Which sauces pair best with these sliders?
Spicy mayo, garlic aioli, honey mustard, or ranch are all excellent choices. Try mixing in a bit of pickle brine or hot sauce to match the flavor profile.
6. Is oven-baking a good alternative to frying?
It works, especially with a well-oiled wire rack and high oven temperature. You won’t get the same level of crispiness, but it’s still delicious and lighter.
7. What’s the best way to make them gluten-free?
Use a gluten-free flour blend and double-check your pickle brine and sauces for hidden gluten. Cornstarch naturally fits into gluten-free diets and helps with crispiness.
These Pickle-Brined Crispy Chicken Slider Bites feature tender, flavorful chicken marinated in dill brine and fried to golden perfection. Perfect for sliders, snacks, or parties.
- Prep Time: 10 minutes
- Cook Time: 15 minutes
- Total Time: 25 minutes
- Yield: Serves 4
Ingredients
1½ lbs boneless skinless chicken thighs
1 cup dill pickle juice
1 cup buttermilk
1½ cups all-purpose flour
½ cup cornstarch
2 tsp paprika
1½ tsp garlic powder
1 tsp onion powder
½ tsp cayenne pepper
1½ tsp kosher salt
1 tsp black pepper
2 large eggs, beaten
Neutral oil for frying
12 soft slider buns
Pickle slices (optional)
Favorite sauce (optional)
Instructions
-
Cut chicken into slider-sized portions.
-
In a bowl, combine pickle juice and buttermilk. Add chicken and marinate for 4 hours or overnight.
-
Mix flour, cornstarch, and spices in one bowl. Beat eggs in another.
-
Remove chicken from marinade and pat dry. Dip in egg, then dredge in flour mix.
-
Let coated chicken rest for 10–15 minutes.
-
Heat oil to 350°F in a deep skillet. Fry chicken in batches, 3–4 minutes per side.
-
Drain on a wire rack.
-
Toast buns if desired.
-
Assemble sliders with chicken, pickles, and sauce.